- Before you start preparing your mounts, discuss the project with Johanna Marin-Carbonne and Anne-Sophie Bouvier to decide on the best sample preparation methodology, the requirements for standards, and the number of samples. Contact details here.
- More about project submission deadlines, and application form and fees here.
- Dr. Bouvier will hand you the necessary standards. A list of the available standards at the SwissSIMS facility is here.
- Every sample plug will need a minimum set of standards, so make sure that you plan enough space for them.
Epoxy mounts
- Use a piece of two-sided tape (as thin as possible), fix it on a stiff flat surface (either a glass plate or an inert, solid plastic; e.g. Teflon); either press the 25.1mm (1-inch) diameter ring or mount support firmly onto the sticky tape (there shouldn’t be any gaps, as the epoxy may leak), or just draw the 1-inch circle on the tape (and use the ring later, once you are ready to pour the epoxy). The diameter MUST be exactly 1 inch (25.1 mm)
2. Pick your grains and mount them onto the tape within the circle:
- Place the standards in the center; the number of standards that need to be mounted with your sample(s) depend(s) on the complexity of the matrix effect and what you will be analyzing with the SIMS.
- The grains or sample(s) need to be kept in an about ~10mm diameter circle in the center of the 1-inch mount (see examples of epoxy mounts in the images below).
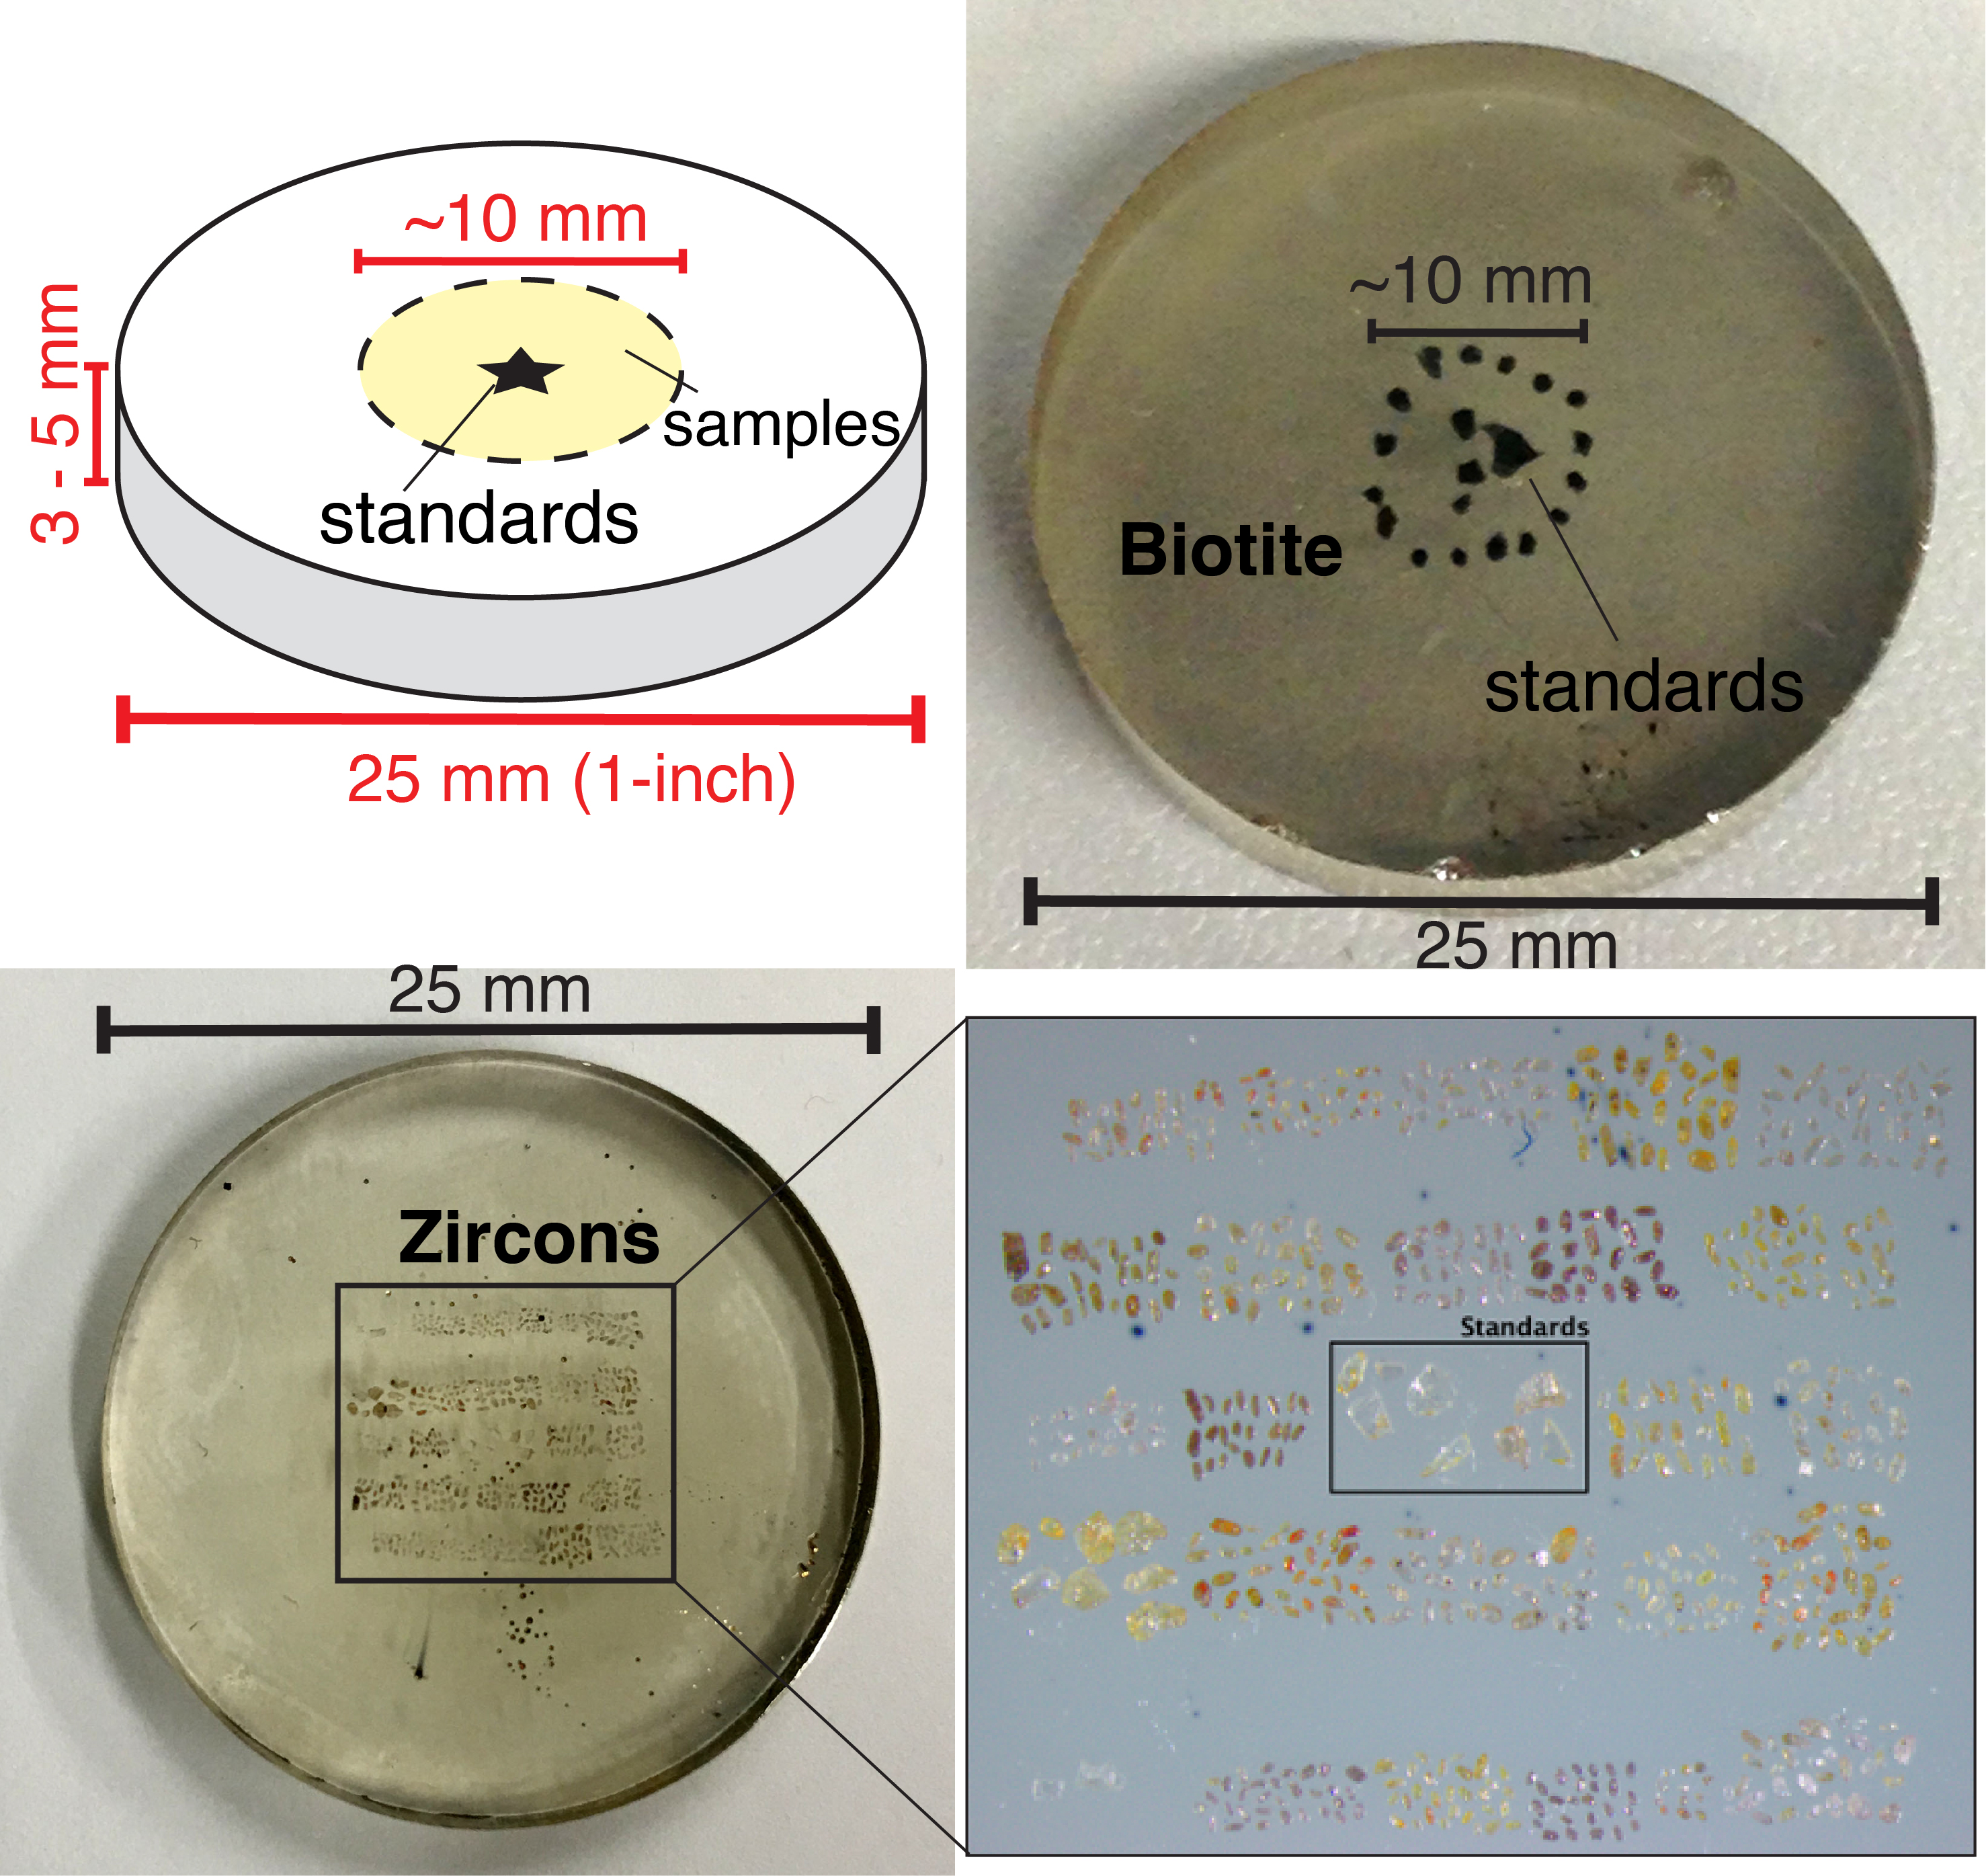
Zircons mount: courtesy of Prof. Andreas Möller (Kansas University)
3. In order to maintain a good vacuum during analyses, we require one of these 2 epoxy resins:
- EpoxiCure
- EpoFix (this is the one we currently use)
More details on the characteristics of the different epoxy resins can be found on the website of the NERC Ion Micro-Probe Facility of the University of Edinburgh: http://www.ed.ac.uk/geosciences/research/facilities/ionprobe/technical/epoxyresins)
- Respect the suppliers’ recommended mixing ratio between hardener and resin, which varies from one brand to another (always written on the bottle), otherwise the resin may never cure properly or may take more time to do so. Also, respect the cure temperature and cure time (for example, with EpoFix, the resin will take 24-48h to cure);
- All bubbles, especially the ones right next to the grains, should be eliminated. This leads to a flatter surface and reduces the risk of charging, and hence better analysis for the final mount. Use a needle to get rid of the bubbles (good results have also been achieved when the sample was placed in a vacuum for about 5-10 min.). Importantly, look at your sample under a binocular and make sure you are happy with the result before the epoxy has cured.
4. Grinding
In order to have a flat surface and a good polishing, the mount needs grinding first:
- We recommend using an automatic grinding machine to produce a flat surface;
- Alternatively, this can be done manually with sandpaper: start with the grid size 800 and sequentially use the 1200 and finally 2000 grid size; use with a thin layer of water; clean the samples carefully between each stage.
- The manual grinding and polishing should always be done in a figure-8 motion (as shown in the figure below), to avoid bulging of the mount surface.
 5. Polishing
Akin to the grinding procedure, polishing requires a few stages with a sequential decrease in grain size of the diamond paste:
- Start with 15 µm, then 10 µm (you can start at 10µm if you use an automatic polishing machine), followed by the 6 µm, 3 µm and finally the 1µm diamond paste.
- If your sample contains soft material (carbonates, micas, etc.) you may have to finish the polishing stage using a 0.5 µm, or even a 0.25µm diamond paste to avoid scratches on the surface of the grains.
- Clean your samples and the polishing device carefully between each polishing stage. We use an ultrasonic bath between each stage (30 secs. to a few min., depending on the fragility of your grains, as they may get damaged if left too long in the ultrasonic bath). Progress should be checked with a reflected light microscope. If big scratches are present, you will have to restart at the previous stage of polishing to remove them.
- Good isotopic measurements require a very small topography and a very flat plug. Use a white light microscope (available at the SwissSIMS facility) to get the confirmation that less than 3µm topography is present.
- The back of the plug needs to be straight and reasonably flat as well. The drying of the epoxy, as well as surface attraction at the contact between the epoxy and the ring or mount support result in a concave structure at the back of the plug. You will have to remove that part with a saw, so that the plug has parallel surfaces (back and front). The mount should be between 3-5 mm thick (e.g. figures of the mounts above).
6. The polished plug needs to be cleaned using dry alcohol in an ultrasonic bath. From then on, the plug should be handled with gloves, oven-dry it at 60°C for at least 24h before coating, and store in a desiccator if the sample is not in use.
Indium mounts
Indium mounts are used for samples which cannot – for any reason – be embedded in epoxy, and in cases where small, already polished fragments of minerals or thin sections are available. Indium mounts contain no (or a minimum amount) of C-H-S, and are used when these elements (or isotopes) are to be measured to avoid contamination of the instrument. These mounts require a special preparation facility, available at the SwissSIMS. Indium is a pure metal, which is expensive (CHF 8-10 /gr). Prefabricated aluminum discs are required.
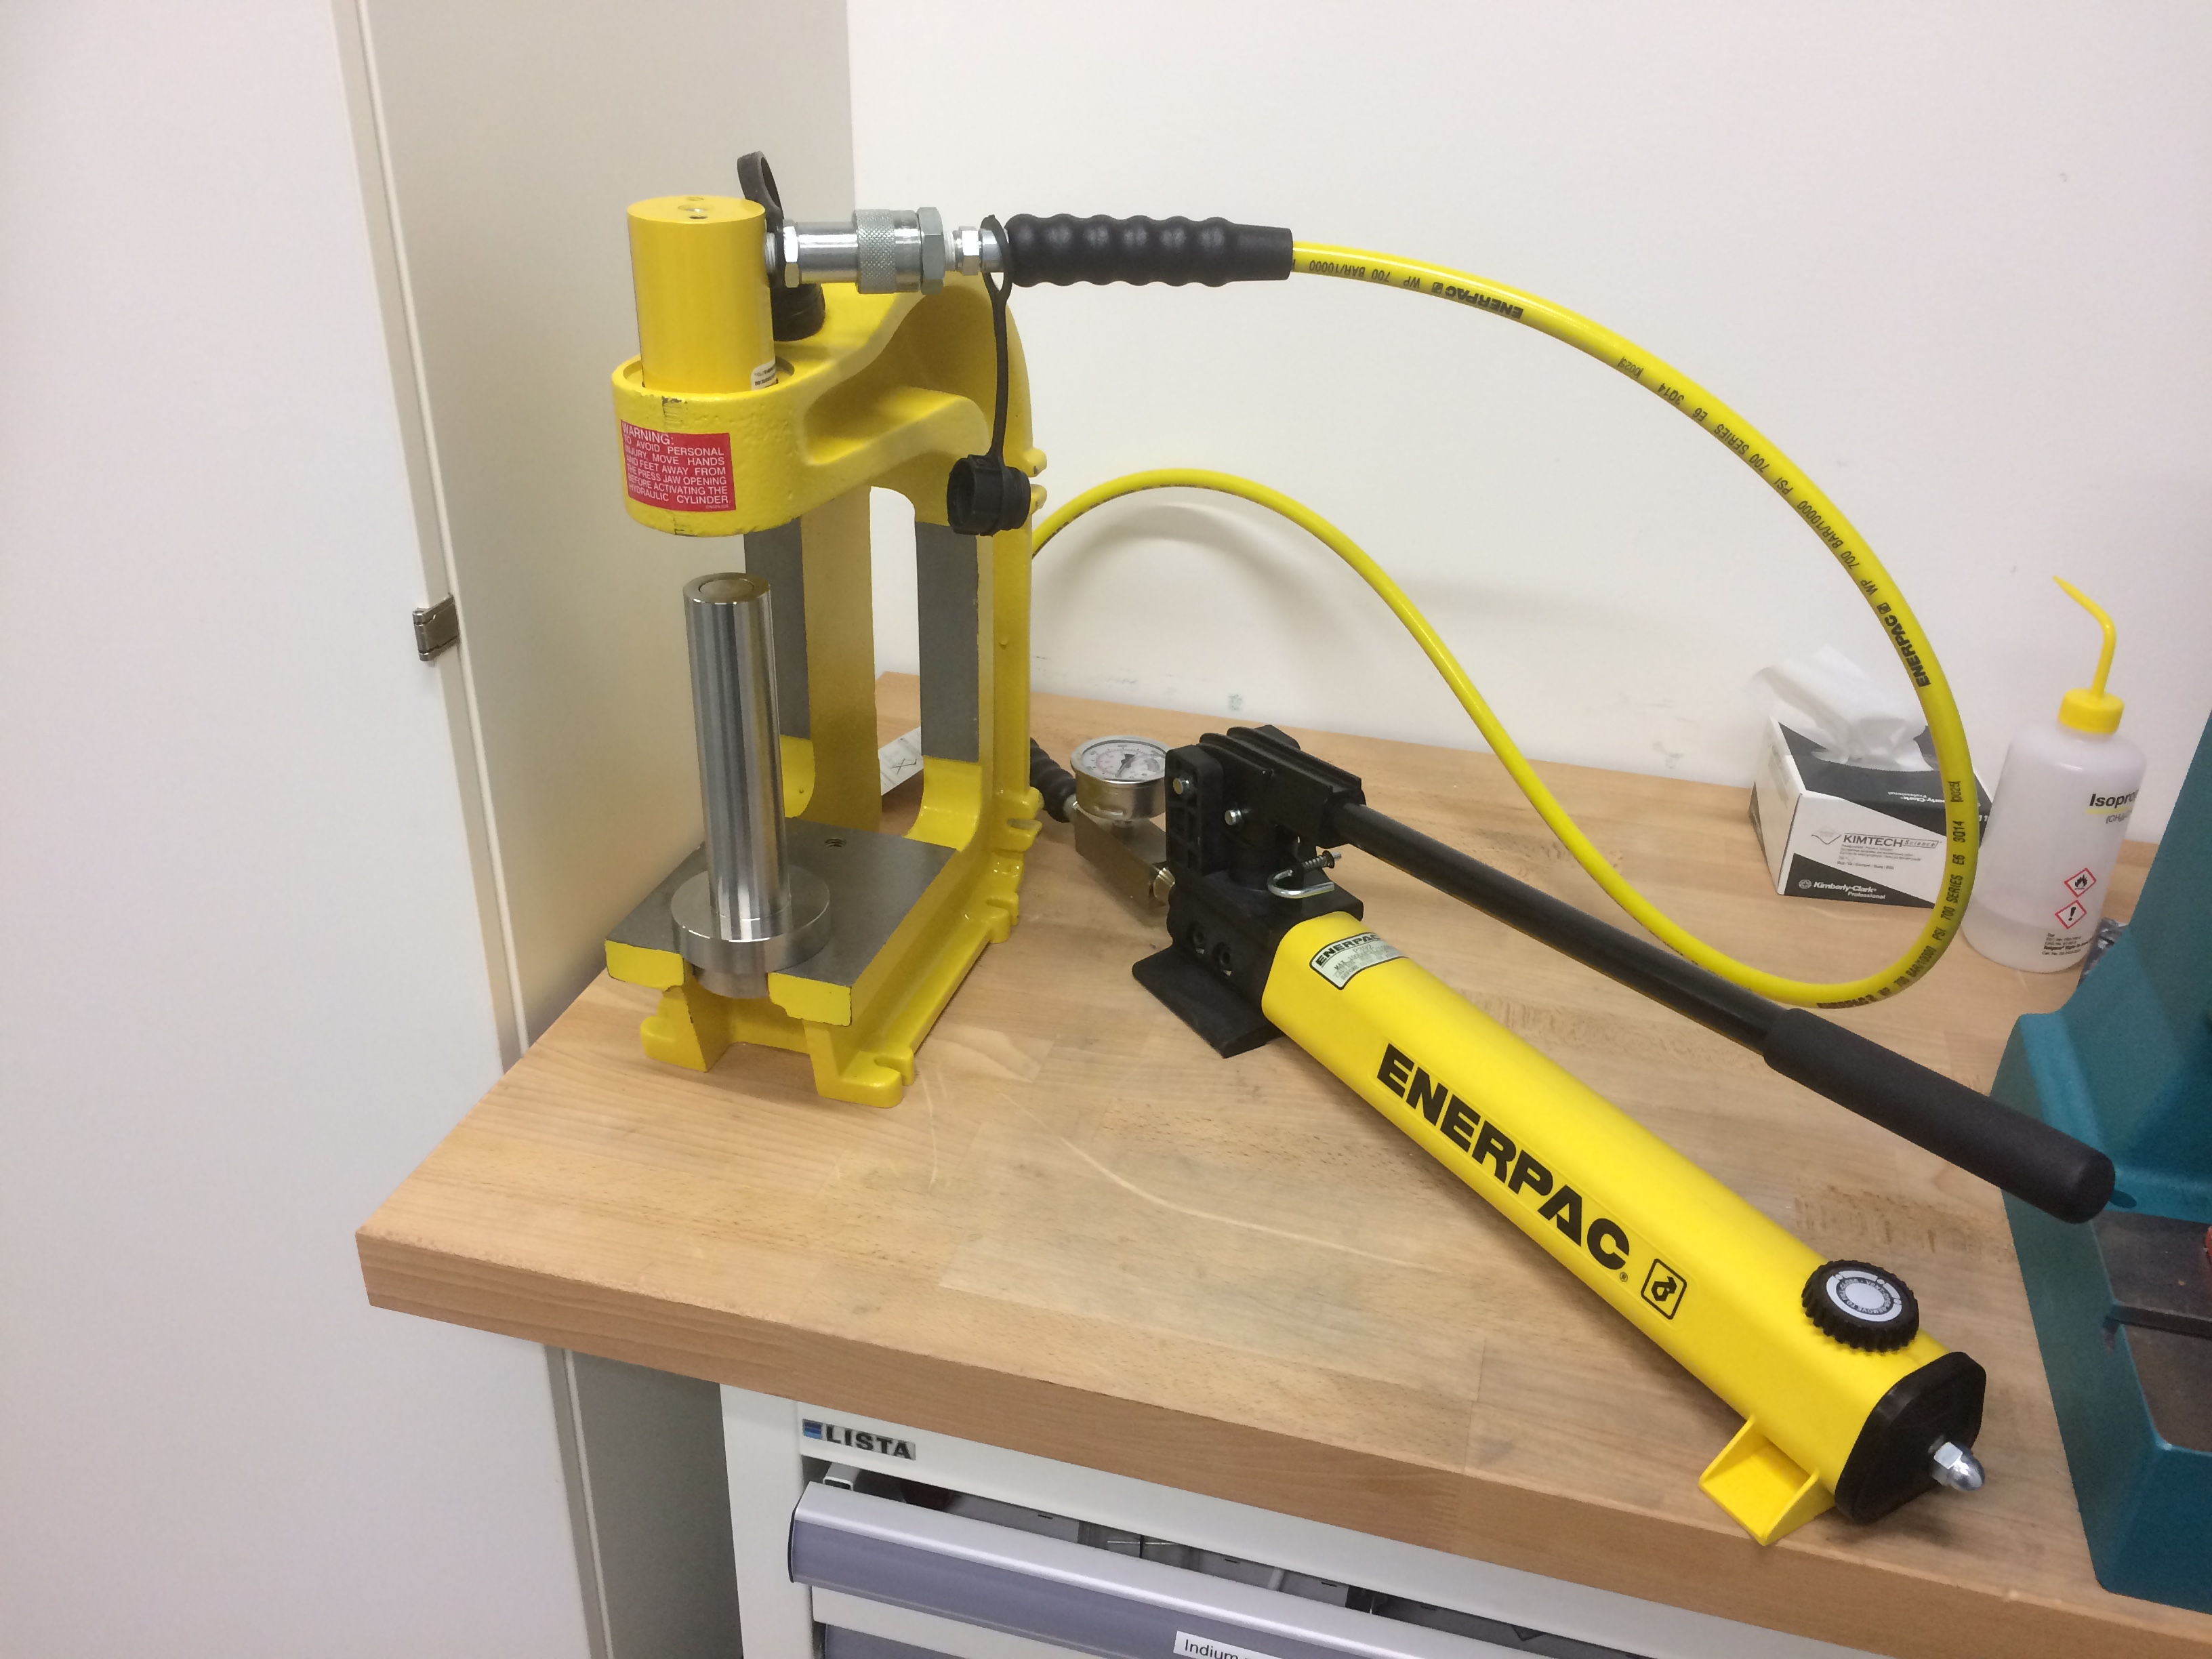
Hydraulic press at the SwissSIMS facility.
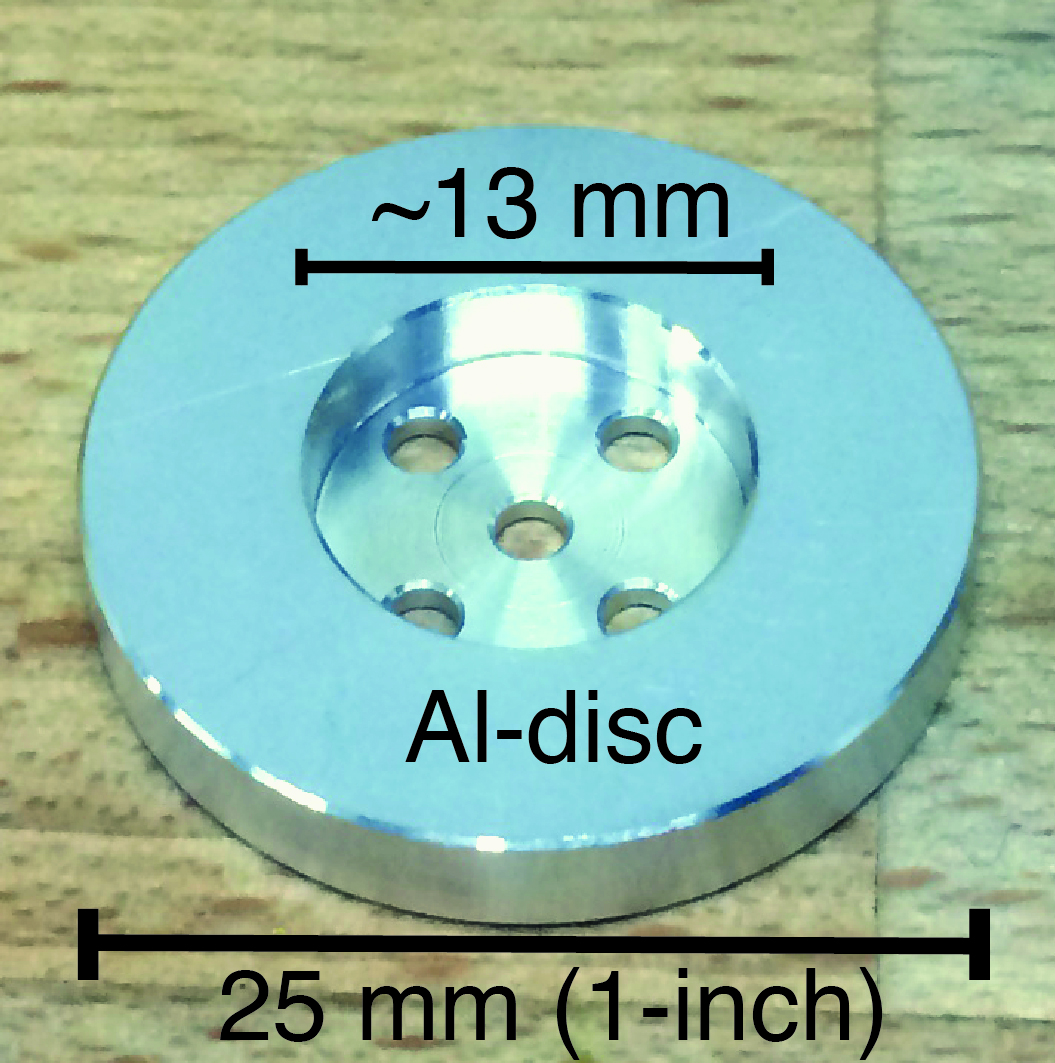
Prefabricated aluminum disc, empty space in the center for the indium and samples; the small holes at the bottom allow to get rid of the excess indium.
- Fragments, standards, and thin section pieces have to be polished PREVIOUS to mounting in indium. Typical sample geometries used are: cutoffs of polished thin sections; single, polished grains. Sometimes small fragments of an epoxy mount can be used. Use the procedure and the recommended epoxy outlined above to make these epoxy fragment;
- Individual grains can be polished by embedding them in Crystalbond or any other epoxy. The grains need to be removed from the epoxy and cleaned (acetone and dry ethanol; make sure no residual glue is left on the grain; sometimes ultrasonic agitation in acetone is needed). Dry each individual fragment or crystal before mounting them in indium;
- In your planning of the mount do not forget the standard(s); they will be pressed in the center of the mount (as shown in the images below).

Example of an indium mount, with 2 thin section cutoffs and 4 different standards in the middle.
- Clean and dry the prefabricated Al-disc before filling the center of the disc with the solid indium droplets (you can eye-ball the required quantity, ideally the well should be filled with indium);
- Transfer the indium-filled disk onto a hot plate to melt the indium (melting point 156.6 °C), then leave it to cool completely;
- Use the hydraulic press to press the indium firmly into the Al-disk (to remove any gaps in the indium), you can go up to 1000 psi; use a metal plate beneath the sample in the press to avoid the indium to flow through the holes at the bottom of the Al-discs, and use a plastic sheet to protect the sample surface;
- Press the samples carefully into the indium using the hydraulic press:
- At this stage, you will NOT use the small metal plate beneath the sample while pressing, as the excess indium has to flow through the holes at the bottom of the Al-disc. Press only gently, so that the samples are fully immersed into the indium, but no pressure builds up into the sample yet;
- For single grains, you can create a small hole (smaller than the sample) with a pointy tool, and gently push the sample into the indium so it stays with the polished surface up;
- If you want to put more than one sample, it may help to press each samples separately to avoid any gap between sample and indium;
- With a reflected light microscope, check that there are no gaps between the indium and the samples;
- Once all the samples and standards are in the indium and you are happy with how the mount looks (e.g. samples and standards look flat; no apparent holes; good contact between the indium and the samples/standards; no excess indium left), press up to 5000 psi and wait ~30 sec. before releasing the pressure;
- At this stage, use the metal plate below the sample to press (unless you think that there is still some excess indium, then press again without the plate to remove it);
- This step should be done in multiple times, with a gradual pressure increase. Each time the sample is pressed, use the reflected light microscope to check that everything still looks right;
- Same as for the epoxy mounts, it is good to check for sample topography (less than 3µm topography) using the white light microscope (available at the SwissSIMS facility);
- It is ok if some indium runs over the Al-disk, as long as (1) the mount surface is flat; and (2) it does not cover the outer 2-3 mm of the Al-disk, as it may prevent the sample to sit completely flat in the SIMS-sample holder;
- When happy with the result, clean the sample in a beaker with acetone (to remove any grease), wipe it clean with isopropanol, and then dry ethanol (and use gloves to handle the sample from here onwards). Do NOT use the ultrasonic bath as it may dislodge some the indium;
- Oven-dry at 60°C (at least 12hrs) before coating and store in a desiccator if the sample is not in use.
Thin sections
Floowing the dimensions given above, please cut the areas of interest in your thin section using a diamond wire saw, and press the cut areas in indium, with a reference material
Documentation of Plugs
Images of the mounts and some final steps before analysis
- The only thing you will see in the SIMS is a large magnification (ca. 1.5 mm field of view) reflected light image of your (gold-coated) sample. It is essential to have a reflected light map of the whole mount – or an exact drawing of the mount – so you can recognize the orientation of the plug, the location of your samples and the standards. Samples and standards need to be labeled on the photos.
- If you have zoned minerals, BSE or/and CL images of all the grains are also required in order to place the spots at the right place, and target specific zones.
- The samples, along with the images, have to be received 2 WEEKS before the analytical session is scheduled, to allow for enough time to (1) check the flatness of the samples with the white light interferometric microscope at the SwissSIMS laboratory; and (2) find a solution if they do not fulfill the requirements for SIMS analysis.
- If all the requirements are met, the samples will be Au-coated before analysis.
- When the samples are not in use, they need to be stored in a desiccator to keep them dry.
———–
Some VERY useful links on sample preparation (with step-by-step photographs):
http://www.ed.ac.uk/geosciences/research/facilities/ionprobe/technical
Epoxy mounts:
http://www.ed.ac.uk/files/imports/fileManager/Grain-Mount-Prep2.pdf
Indium mounts:
http://www.ed.ac.uk/files/imports/fileManager/IndiumMountPrep.pdf
… and more links here.